There are 3 methods to access Audio Device Settings on Microsoft Skype for Business Basic:
- Click on Show Menu (1) > Tools > Audio Device Settings;
- Click on Options (2) > Audio Device;

- Click on Select Primary Device (3) > Audio Device Settings;

- Audio Device (4) > Select the device you want to use for audio calls: PC Mic and Speakers (5);
- Customize your device (changes will apply to your next call);
- Speaker: select (if available) Speaker/Headphones (Realtek® Audio) (6);
- Microphone: select (if available) Microphone Array (Realtek® Audio) (7);
- Check Call Quality (8) to make a test call.

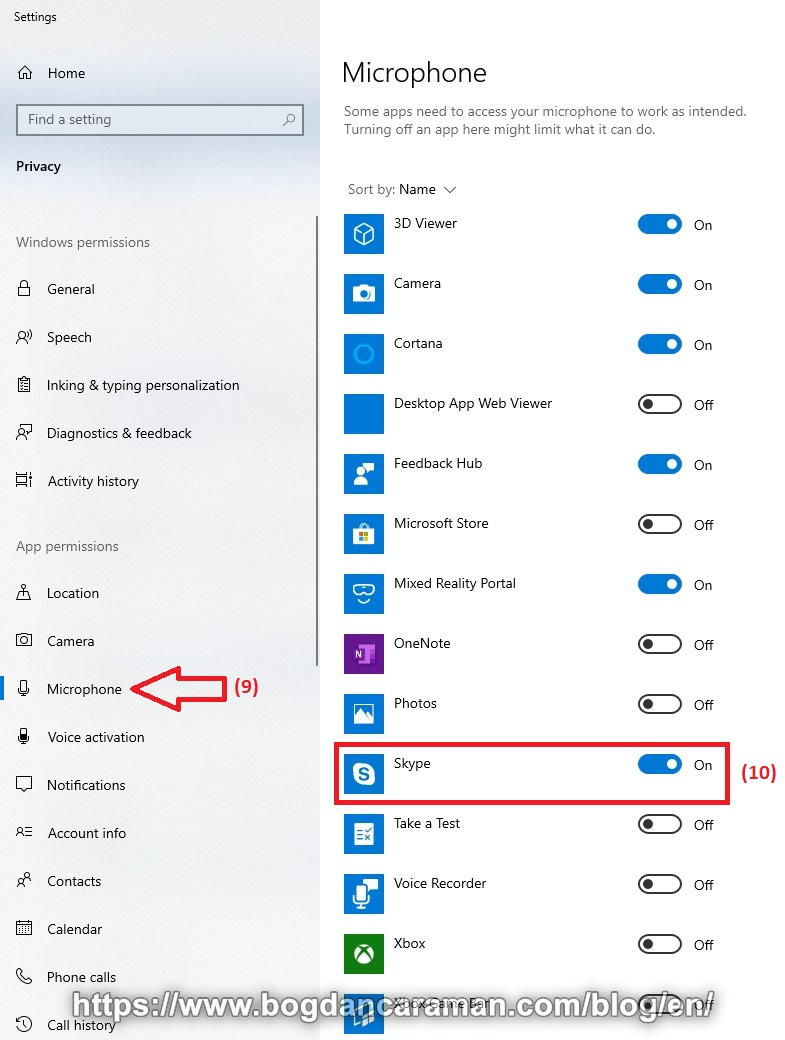
- If the microphone is not working then check the following:
- Go to the search bar (Windows key + S) and type “Microphone privacy settings“;
- Select from Privacy > Microphone (9);
- The „Allow apps to access your microphone” must be On;
- „Choose which Microsoft Store apps can access your microphone” for Skype click to be On (10);
- „Allow desktop apps to access your microphone” > On (Skype for Business, see „Last accessed”).
- Check if your Digital-array microphones for your device is set up as Default Device:
- Go to the search bar (Windows key + S) and type „control panel” and click on it;
- Go to Sound > Recording tab. If your Digital-array microphone (11) is not selected, then right-click on it and select „Set as Default Device”;

- Double-click on the Microphone (in our case Microphone Array (Realtek® Audio)) option to reveal a popup;
- Select the Advanced tab here and make sure that both the options under the Exclusive Mode are unselected (Allow applications to take exclusive control of this device; Give exclusive mode applications priority).

- If the microphone was selected but you can’t still hear your voice then check:
- Go to the search bar (Windows key + S) and type „control panel” and click on it;
- Go to Sound > Playback tab. If your Speaker/Headphones (Realtek® Audio) is not selected then, right-click on it and select „Set as Default Device” or „Set as Default Communication Device”.

- If your „microphone does not detect of single jack headset/earphones” then it doesn’t work. However, on many PCs, the smartphone headset/mic
combo does not work without an adapter for the plug. The smartphone plug is a “TRRS” (Tip, Ring1, Ring2, Sleeve), and PC’s use a “TRS” (Tip,
Ring, Sleeve). There are adapters available to convert and split the mic and headset into separate plugs. - If your audio device may cause an echo then check your AUDIO Boost from the Control Panel > Sound:
- Go to the search bar (Windows key + S) and type „control panel” and click on it;
- Control Panel > Sound > Recording and select your active microphone, in our case Microphone Array (Realtek® Audio) > then Properties;
- At Levels select +10.0 dB for Boost. If you still have issues with echo, then select 0% but you must talk closer to the microphone.

- NO AUDIO from Remote Desktop Connection?
- Open Remote Desktop Connection > Local Resources > Remote audio > Configure remote audio settings > Settings…;

- Remote audio playback > Play on this computer;
- Remote audio recording > Record from this computer.

- NO AUDIO from remote connection?
- Click on Show Details when the Remote Desktop Connection > “Do you trust the publisher of this remote connection?” shows;

- Allow the remote computer to access the following resources on my computer: Audio recording to be checked.

Other Reference: Troubleshoot audio and video in Skype for Business.