PHP (recursive acronym for PHP: Hypertext Preprocessor) is a widely-used open source general-purpose scripting language that is especially suited for web development and can be embedded into HTML.
I will follow the installation steps of the PHP Non Thread Safe version on a Windows Server 2019 Standard Evaluation (Desktop Experience) operating system that needs IIS and CGI to be installed. Install first the IIS (Internet Information Services) by opening Server Manager where we have Manage, Tools, View, and Help menus. At Manage we click on Add Roles and Features and for IIS installation on Server Roles select Web Server (IIS), then Add Features and Next after selecting. At Role Services, expand Application Development and select CGI (Common Gateway Interface). We still have a final Next and then Install.
The second step is to download and install Microsoft Visual C++ Redistributable Package by going to the latest supported Visual C++ downloads and downloading the latest version of the Microsoft Visual C++ 2015-2019 Redistributable (x64) – 14.22.278.21 (x64: vc_redist.x64.exe) and install it;
After adding these roles, and features and installing Microsoft Visual C++ Redistributable Package we can start installing the PHP Non Thread Safe version for a web server:
- We are going to the PHP website at https://windows.php.net/download/, where we have to download the x64 Non Thread Safe Zip version;
- Right-click on the .zip file, select Extract All… and at Select a Destination and Extract File, Files will be extracted to this folder choose C:\php and click Extract;
- From C:\php search the file php.ini-production then right-click to Edit with Notepad or Notepad++;
- Use Ctrl+F to find
;cgi.force_redirect = 1 and replace with cgi.force_redirect = 0
;fastcgi.impersonate = 1 with fastcgi.impersonate = 1
;extension_dir = "ext" with extension_dir = "C:\php\ext"
- Save the changes and create a new file through File\Save as… (Ctrl+Alt+S) and instead of php.ini-production change with php.ini;
- Open Internet Information Services (ISS) Manager through Start\Windows Administrative Tools or Server Manager\Tools\Internet Information Services (ISS) Manager;
- Find Handler Mapping, and at Actions\Open Feature, Actions\Add Module Mapping… ;
Request path: *.php
Module: FastCGIModule
Executable: C:\php\php-cgi.exe
Name: PHP with FastCGI
- Click OK and Yes to confirm adding the module mapping;
- At Internet Information Services (ISS) Manager we will open and configure the FastCGI Settings by Actions\Open Feature or double-click on the icon;
- Select or double-click on C:\php\php-cgi.exe from Use this feature to configure FastCGI applications used by websites on this server and from Actions click Edit;
- The Edit FastCGI Application was opened and at FastCGI Properties under General\Environment Variables (Collection) click on the three dots …
- Under Members click Add and for the Name Properties we change Name: PHP_MAX_REQUESTS and VALUE: 5000 then click OK to save the changes;
- OK to exit from Edit FastCGI Application and come back to the FastCGI Settings and we can close Internet Information Services (ISS) Manager;
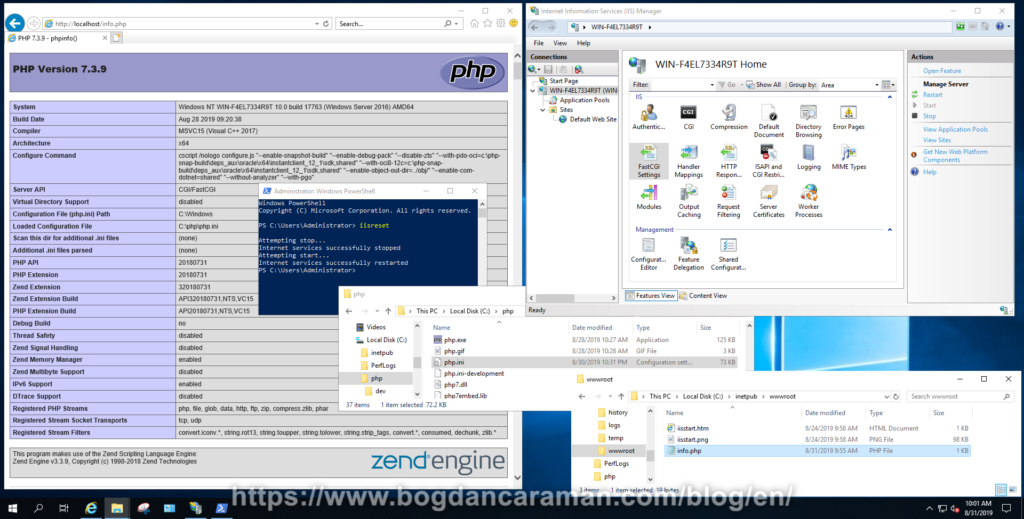
- To restart IIS open the Comand Prompt or PowerShell and type iisreset
C:\Users\Administrator>iisreset
Attempting stop...Internet services successfully stoppedAttempting start...Internet services successfully restarted
- Still on Command Prompt/PowerShell change directory (cd c:\php) to C:\php and type php –info where a long list of information will be displayed. This means that PHP is workable;
- You can go to the C:\inetpub\wwwroot directory and create info.php file and insert the
<?php phpinfo(); ?>code; - Open your favorite browser and type http://localhost/info.php where you should see the PHP information page;
- To update to a newer PHP version, make a backup of the php.ini, delete the C:\php folder and extract like in step 2 the new .zip version, then copy the php.ini file in C:\php. But if there are only a few lines to change, you can repeat steps 4 and 5.
You can find the latest version of PHP at https://windows.php.net/index.php through the Download menu.