Rufus is a free and open-source software (FOSS) portable application for Microsoft Windows that can be used to:
- format and create bootable USB flash drives from ISO image;
- creates Live USBs that can contain a full operating system and can be booted from a computer;
- updating the BIOS (Basic Input/Output System) of the motherboard/server board. To update the BIOS you will need the latest Firmware file from the manufacturer’s site according to the motherboard model;
- allows the installation of any other DOS (Disk Operating System) software.
When each time a new operating system is released, it’s uploaded as an ISO disk image, a file that stores all the content and structure of an entire disk. Take for example the latest version of Windows where the disk image can be created and downloaded using the MediaCreationTool, choosing the language and architecture of the workstation, 64-bit (x64) or 32-bit (x86). After the ISO image is saved, we can create a bootable USB drive:
- Download Rufus x.x Portable from https://rufus.ie;
- When opening the Rufus portable application with a double-click, the first window is “update policy” where we accept it with Yes;
- “rufus.ini” will be the first file created after the program runs for the first time, then, during the application use, the folder “rufus_files” will contain the Syslinux bootloader, so it is good that from the beginning, the portable application should be copied and run from a folder called Rufus;
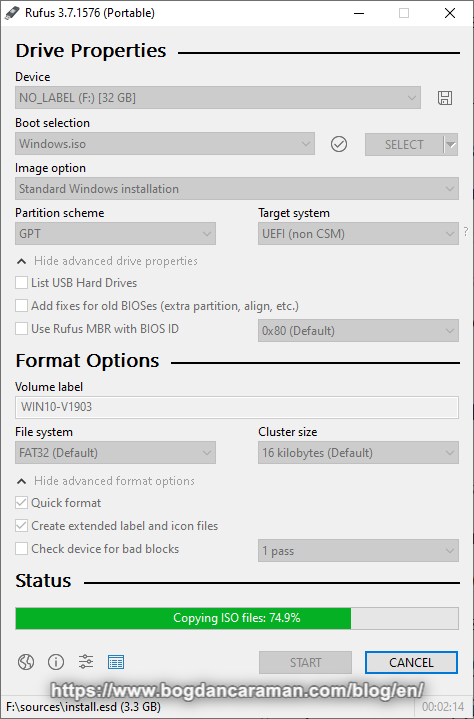
- Drive Properties: „Device”, tells us which USB device you want to format;
- Under the “Boot selection” section, click the Select button on the right;
- Select the Windows.iso from its folder location;
- “Image option” select the Windows Standard installation option if you want to use this device to install Windows to another computer or Windows To Go for running the Windows directly from a certificated Windows To Go USB device;
- „Partition scheme”: GPT (GUID Partition Table) or MBR (Master Boot Record). MBR can be used for drives up to 2 TB, and supports only 4 primary partitions – if you want more, you have to make one of your primary partitions an “extended partition” and create logical partitions inside it while the new GPT scheme does not have a limit to partitions, depending only on the operating system; for example, for Windows, you can create up to 128 partitions and you don’t have to create an extended partition anymore; MBR is used for motherboards that only have the BIOS Legacy mode and for those with the UEFI (Unified Extensible Firmware Interface) BIOS boot mode we choose GPT;
- „Target system”: BIOS (or UEFI-CSM (UEFI with Compatibility Support Module)) if we chose the MBR partitioning scheme and UEFI (non-CSM (Compatibility Support Module)) for GPT;
- Under the „Show/Hide advanced drive properties”, leave the default settings;
- Format Options: under the „Volume label” field, enter a descriptive name for the drive – for example, „WIN10-V1903”. If we choose FAT32 as a file system, then the limit is 11 characters for the names and 32 characters for the NTFS;
- File system: NTFS (New Technology File System) or FAT32 (File Allocation Table). We choose FAT32 if we don’t want to disable Secure Boot when using UEFI:NTFS;
- Under the „Cluster size” (Default cluster size for NTFS, FAT, and exFAT), leave the default settings;
- Under the „Show/Hide advanced format options” select „Quick Format” and „Create extended label and icon files” which allows you to display international labels and set a device icon (autorun.inf file will be created);
- Click the START button;
- After the following WARNING message: ALL DATA ON DEVICE ‘x’ WILL BE DESTROYED click OK or Cancel to quit;
- When the „Status” shows „READY” click the „Close” button to exit from Rufus.
The USB flash drive was created and we can now install the operating system to the new or own station by choosing the primary USB bootable/removable device via BIOS.
You can find the latest version of Rufus at https://rufus.ie